Microsoft has introduced Translytical Task Flows (Preview) in Power BI — a groundbreaking capability that brings transactional actions directly into the analytical environment. With this new feature, users can initiate tasks such as creating, updating, or deleting records, and even trigger automated workflows — all within a Power BI report. This marks a major shift in Power BI’s functionality, transforming it from a purely analytical tool into a platform that also supports real-time interaction and operational decision-making. By enabling users to move seamlessly from insight to action, Power BI now empowers more dynamic and efficient business processes without the need to switch between applications.
Let’s explore the following scenario where Translytical Flows in Power BI can add significant value:
Scenario: Streamlining Lead Qualification for Sales Managers
A sales manager frequently monitors a Power BI dashboard that aggregates incoming leads from various sources such as web forms, marketing campaigns, and events. This dashboard provides real-time insights into critical lead metrics, including source, score, status, owner, and engagement level.
Previously, when the manager identified a high-potential lead meeting predefined qualification criteria such as a lead score above 80, confirmed budget, and established contact, they had to switch to Dynamics 365 or another CRM system to manually qualify the lead. This context switching disrupted the analytical workflow, reduced efficiency, and delayed timely follow-ups.
With the introduction of Translytical Task Flows in Power BI, this process becomes seamless. The sales manager can now take direct action — such as qualifying the lead—without leaving the Power BI report. This embedded transactional capability not only accelerates decision-making but also ensures a more fluid and productive user experience by integrating insights and actions in one unified interface.
Step 1: Enabling Required Features for Translytical Actions in Power BI
Follow the steps below to set up the required features and dependencies that allow Translytical Flows to function.
Step1: Enable required Power BI Settings.
Open Power BI desktop.
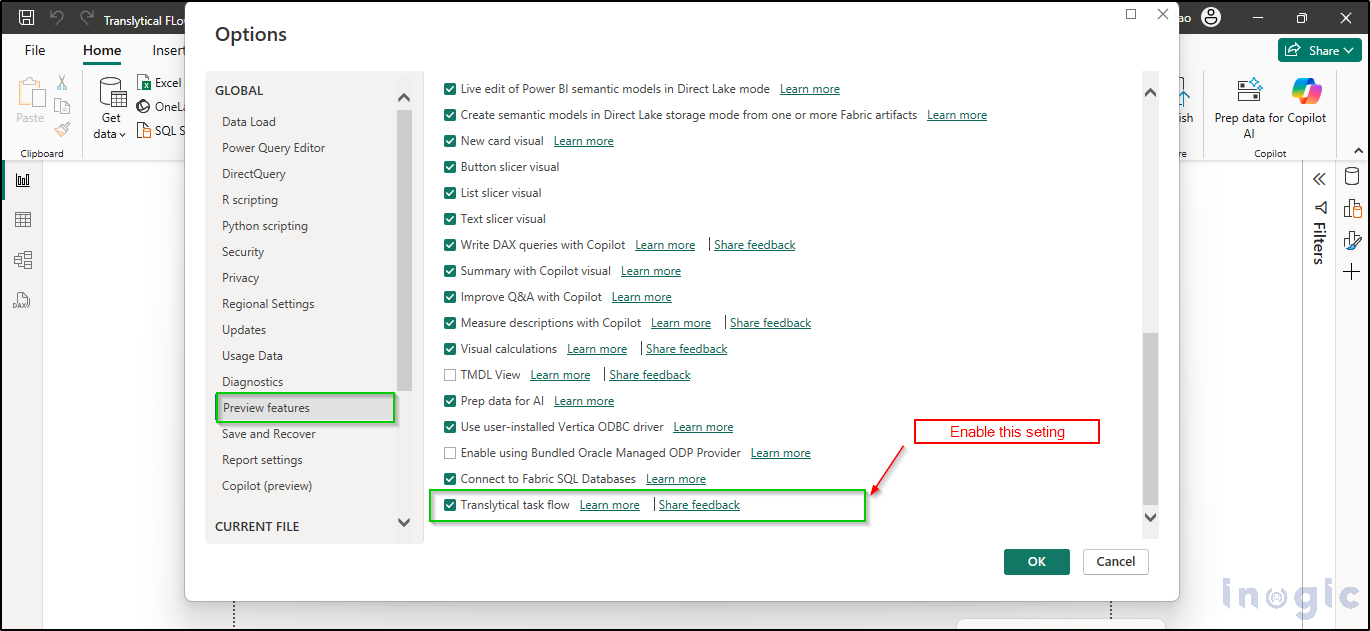
Click on the Setting icons as displayed below:
Navigate to Preview Features and activate the option for Translytical Task Flows.
Step 2: Enable Required Fabric Settings:
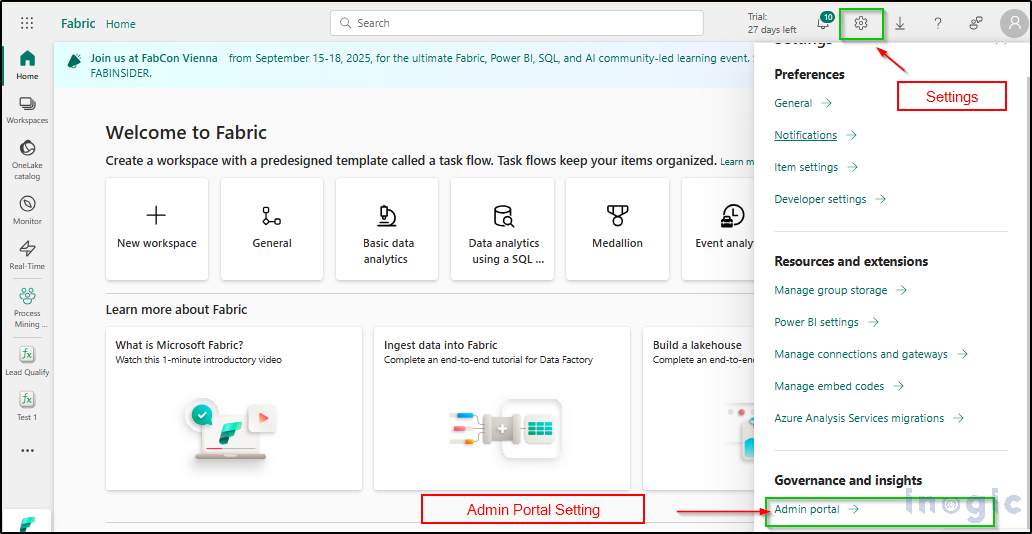
Open Microsoft Fabric and sign in with an administrator account.
Navigate to Settings and select the Admin Portal located under the Governance and Insights section.
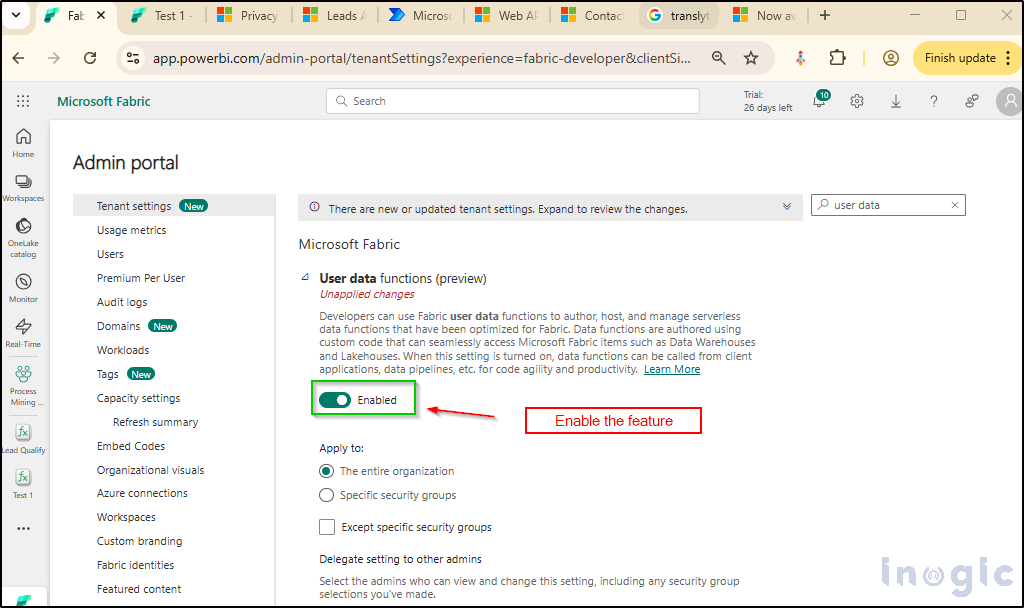
Go to Tenant Settings, locate User Data Functions, expand the section, and enable the User Data Functions Note: It may take approximately 15 minutes for the changes to take effect.
Now the required Power BI desktop and fabric settings have been enabled.
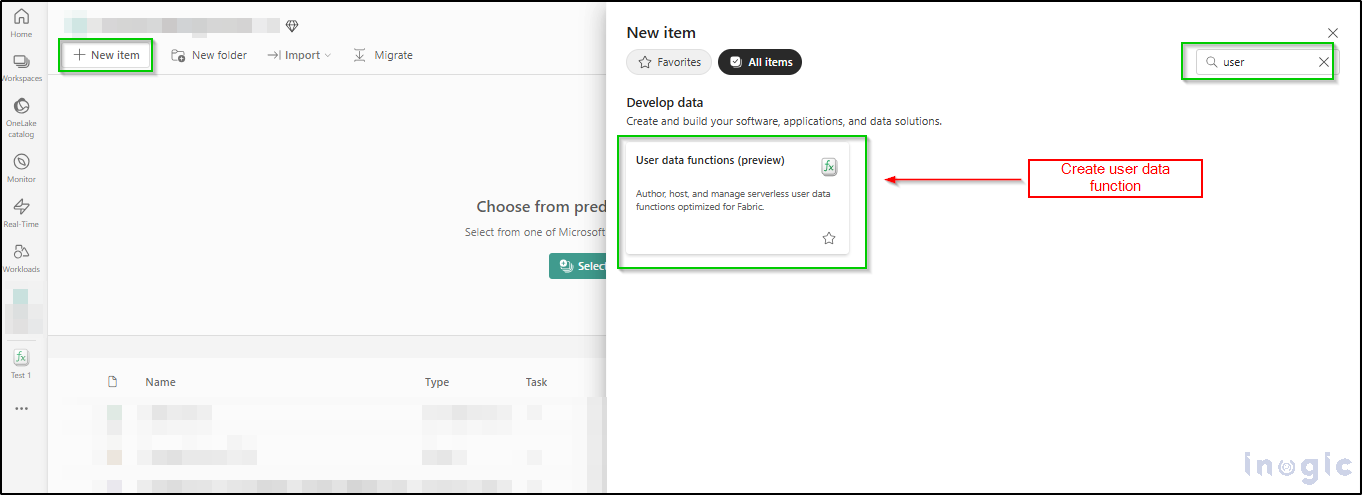
Step 2: Set Up User Data Functions in Microsoft Fabric for Translytical Flows
After enabling the necessary features in Power BI and Microsoft Fabric, the next step is to create User Data Functions within Fabric. Follow the steps below to configure them properly.
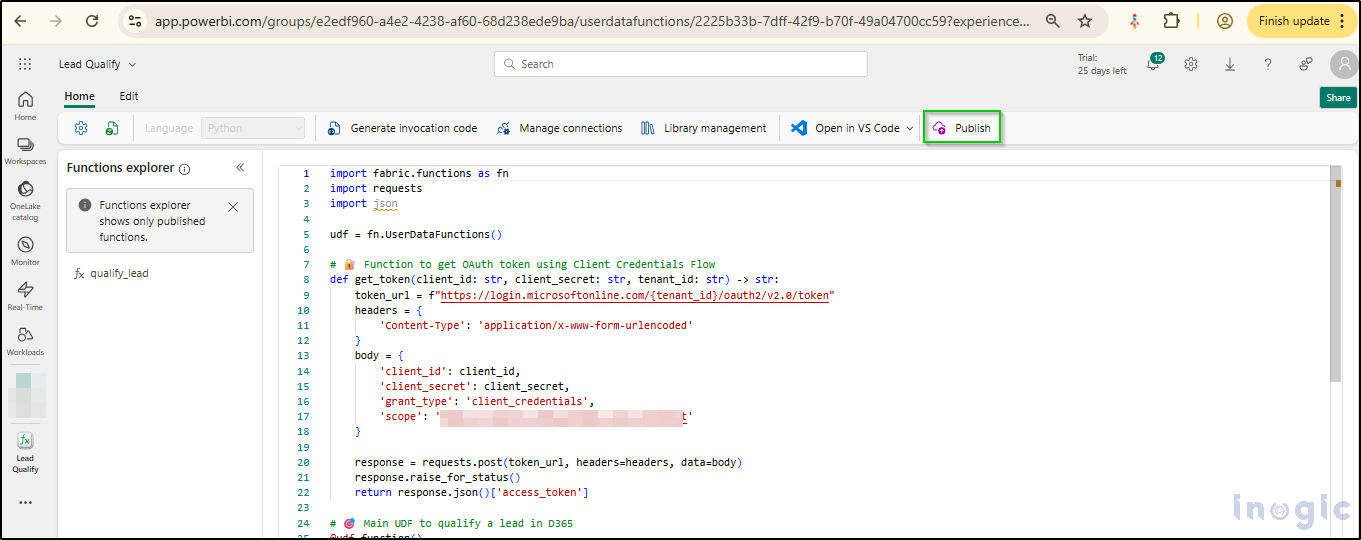
Open the workspace where you you’d like to create a User Data Function.
You’ll find a Function Explorer where the code needs to be pasted. It supports the Python 3.11.9 runtime and allows the use of publicly available libraries from PyPI.
Paste the code that implements the lead qualification logic into the editor.
Code Example: User Data Function
import fabric.functions as fn
import requests
import json
udf = fn.UserDataFunctions()
# Function to get OAuth token using Client Credentials Flow
def get_token(client_id: str, client_secret: str, tenant_id: str) -> str:
token_url = f”https://login.microsoftonline.com/{tenant_id}/oauth2/v2.0/token”
headers = {
‘Content-Type’: ‘application/x-www-form-urlencoded’
}
body = {
‘client_id’: client_id,
‘client_secret’: client_secret,
‘grant_type’: ‘client_credentials’,
‘scope’: ‘<Environment URL>/.default’
}
response = requests.post(token_url, headers=headers, data=body)
response.raise_for_status()
return response.json()[‘access_token’]
# Main UDF to qualify a lead in D365
@udf.function()
def qualify_lead(topic: str,leadid:str) -> str:
client_id = “<Client ID>”
client_secret = “<Client Secret>”
tenant_id = “<TenantID>”
environment_url = “<Environment URL>”
try:
# Step 1: Get token
token = get_token(client_id, client_secret, tenant_id)
headers = {
‘Authorization’: f’Bearer {token}’,
‘Accept’: ‘application/json’,
‘OData-MaxVersion’: ‘4.0’,
‘OData-Version’: ‘4.0’
}
# Step 3: Update lead (e.g., set statecode = 1)
update_url = f”{environment_url}/api/data/v9.2/leads({leadid})”
payload = {
“statecode”: 1 # Example: mark lead as Qualified or Inactive (depending on your config)
}
patch_headers = headers.copy()
patch_headers[“Content-Type”] = “application/json”
patch_headers[“If-Match”] = “*” # Optional for force update
patch_response = requests.patch(update_url, headers=patch_headers, json=payload)
if patch_response.status_code in [204]: # 204 = success (no content)
return f”Lead with subject ‘{topic}’ has been Qualified.”
else:
return f”Failed to update lead: {patch_response.status_code} – {patch_response.text}”
except requests.exceptions.HTTPError as http_err:
return f”HTTP error: {str(http_err)}”
except Exception as e:
return f”Unexpected error: {str(e)}”
Once the above code is copied to the User Data Function, publish the functions.
Step 3: Building the Report and Calling the User Data Function in Power BI
Once the User Data Function has been published to the workspace, the next step is to build a Power BI report and execute the function. Follow the steps below to implement this integration and fulfill the requirement.
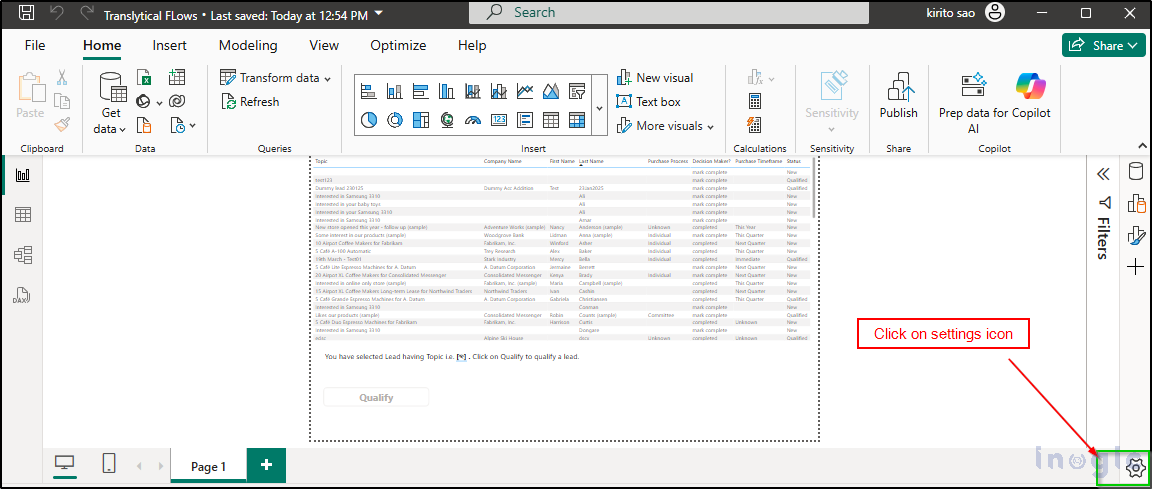
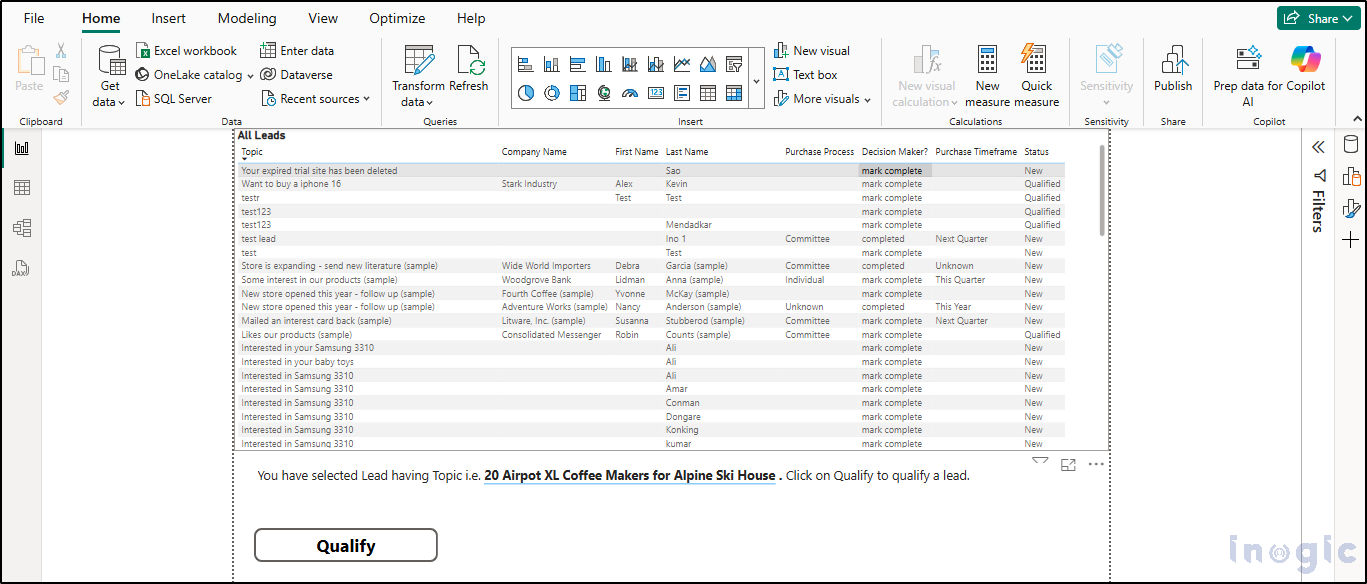
Add a Table Visual for LeadsBegin by adding a table visual to your report that displays lead information. Include essential fields such as Lead ID, Topic, Status, Score, and other relevant columns.
Insert a Text Box for Lead Selection FeedbackAdd a text box that dynamically shows the selected lead and a message prompting the user to qualify it. This improves user guidance and interactivity.
Add a ‘Qualify’ ButtonPlace a button labeled “Qualify” on the report. Clicking this button will trigger the User Data Function. The report layout at this point will include the table, message box, and button, as shown below:
Create Measures for Selected Row ContextDefine two DAX measures to capture the context of the selected row:
SelectedLeadID = SELECTEDVALUE(‘lead'[Lead])
SelectedLeadTopic = SELECTEDVALUE(‘lead'[Topic])
These measures will be passed as parameters to the data function.
Register the User Data FunctionNext, register the User Data Function to be triggered when the Qualify button is clicked.
Configure the Button to Call the Function
Select the Qualify
In the Format pane, expand the Action
Set the Type to Data Function.
Provide the Workspace Name and Function Name (e.g., qualify_lead) where the function is deployed.

Pass Parameters to the User Data Function
While configuring the button action, ensure that you map the parameters required by the function.
For lead ID, assign the measure: SelectedLeadID
For the topic, assign the measure: SelectedLeadTopic
This ensures that the function receives the correct context based on the selected row in the table.
Publish the ReportAfter completing all configurations, publish the Power BI report to the appropriate workspace where the User Data Function is deployed. This makes the solution accessible to users and enables real-time interaction directly within the report.
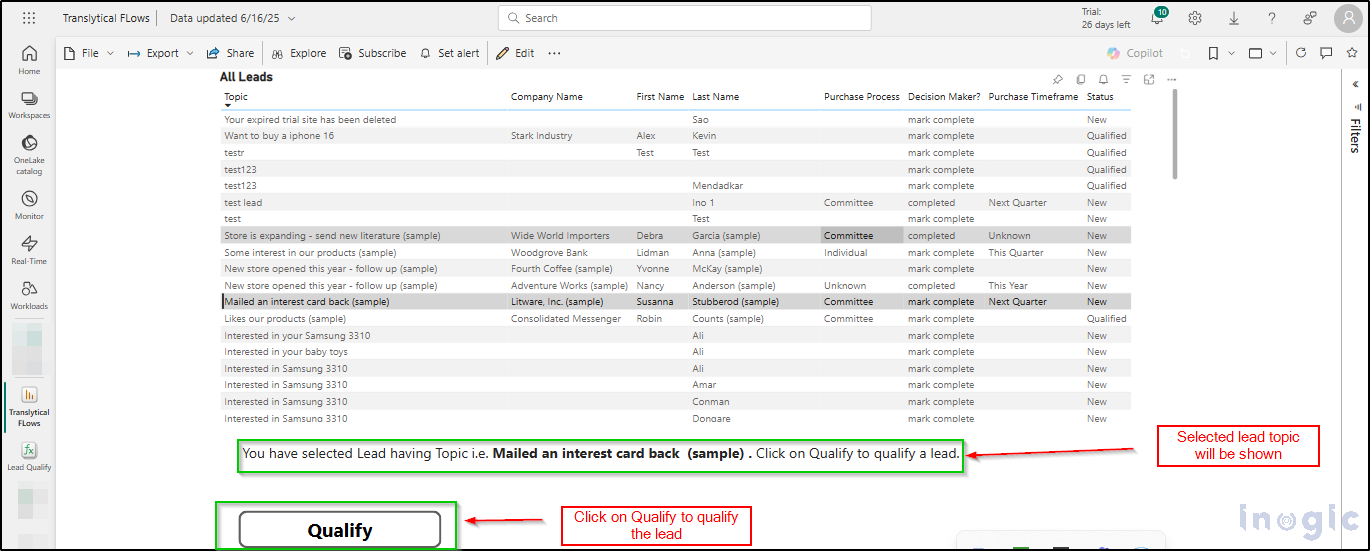
Step 4: Executing and Testing User Data Function in Report
Select a Lead to QualifySelect the lead you wish to qualify by clicking on it in the report table. The selected lead’s details will be reflected in the text box, confirming your selection.
Trigger the QualificationClick the “Qualify” button to execute the User Data Function. This action will send the selected lead’s information to the backend function for processing.
Confirmation MessageIf the lead is successfully qualified, a confirmation popup will appear on the screen, indicating the operation was completed successfully.
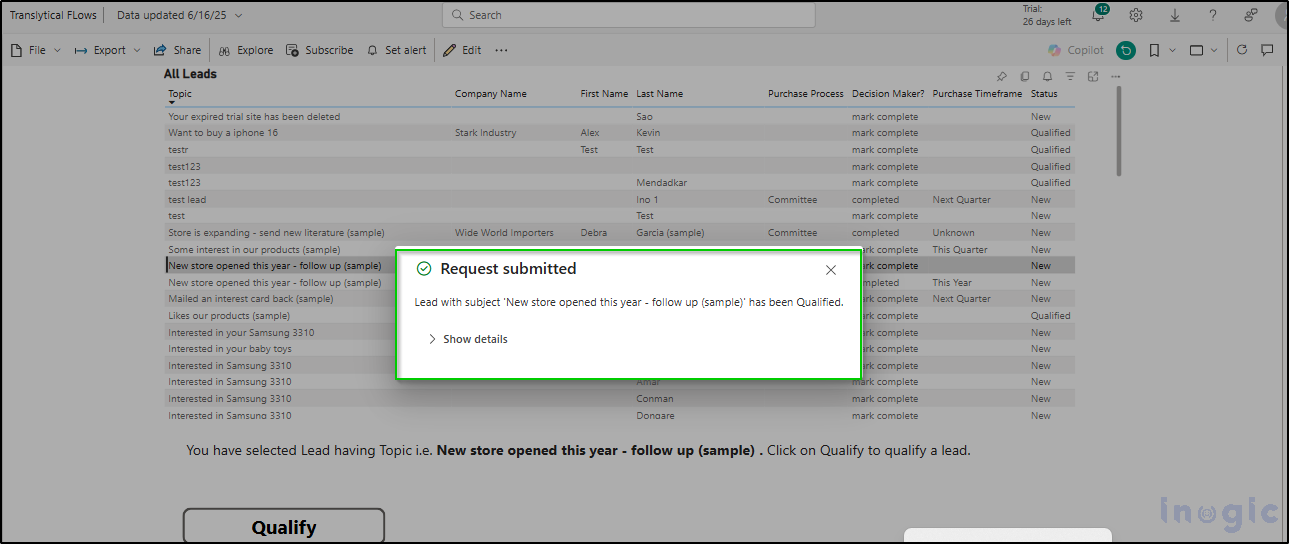
With this setup, managers can now qualify leads directly from the Power BI report, eliminating the need to switch between systems. This enhances productivity and streamlines the lead management process.
Conclusion
Translytical Task Flows in Power BI mark a major step forward, allowing users to move from insight to action without leaving their reports. By embedding transactional capabilities, Power BI now enables real-time updates, workflow triggers, and automation, streamlining decision-making and improving business responsiveness.